The donation process within Donor Management follows a Pledge > Payment > Receipt flow for every donation. Depending on the organization and donation type, the process can be halted after each stage. Below is a high-level breakdown of each stage:
1. Pledge: A constituent has committed to providing a donation to your organization. Payment has not been received but entering a pledge allows your organization to track the commitment and follow-up if payment is not received. Pledge information rolls-up to the donor and any campaign/designation/appeal/tribute records tied to the donation.
2. Active Payment: The donation payment has been received (e.g. Cheque) but the payment has not been deposited. The transaction is not yet complete.
3. Complete Payment: The donation payment has been received and deposited. The organization needs to complete the pledge process. Payment information rolls-up to the donor and any campaign/designation/appeal/tribute records tied to the donation.
4. Tax Receipt Generation: This is the last step in the process. The system generates a tax receipt document containing a summary of the donor and donation details. Tax receipt documents are generated using the organizations receipt template. This step is not required for non-receiptable donations.
Within Donor Management , there are multiple ways to create a new donation depending on where users are in the solution. This flexibility allows users stay on their current page while quickly and easily inputting information. Below are the ways a Donor Management user can enter a new donation.
Creating and Processing Donations
Quick Create: New Donation
From anywhere within the solution, users are able to access the Quick Create forms from the navigation bar.
The Quick Create button allows users to create core records like e-mails, phone calls, contacts, accounts, donors, and donations. Clicking on this button displays a minimized form with configurable fields that allow users to enter information quickly and on the fly.
To create a New Donation using the Quick Create form:
1. On the navigation bar, click +Create.
The tiles display.
2. Scroll over to click Donation Gift.
A Donation Gift create form will drop-down.
3. Select a Donor from the lookup in the Donor field.
4. In the Gift Name field, enter a name.
5. Select the Campaign, Appeal Code, Designation, etc. from the corresponding lookup fields.
NOTE: Fields marked with the red asterisk indicate that completing the field is mandatory.
8. Click Save on the bottom right.
The Donation Gift record is saved and a message appears at the top of the screen.

9. If you wish you can view the record or create another record by clicking View Record or Create Another from the message box.
New Donation: Quick Create Details
Users can create a Donation Gift record using a Quick Create form or a Full form. In many cases it is easier to use a Quick Create form for on-the-fly gifts. This makes record keeping simple and accessible. The following is an example:
1. From the navigation bar click +Create
A list of Activities and Records will appear.
2. Select Donation Gift icon.
The Donation Gift form displays.
4. Complete the fields and Save.
NOTE: Mandatory fields marked with a red asterisk.
Create a New Donation Gift for a Donor
Users may wish to create a new donation for an existing donor. This can be quickly done by adding to an existing donor record. This will open the donation Quick Create form.
To create a new donation,
1. Open the donor record
2. Click the + sign in the Donation Gifts for Donor section

The New Donation Gift form displays.
3. Fill in the fields accordingly.
NOTE: Fields marked with the red asterisk indicate that completing the field is mandatory.
4. Click Save at the bottom of the form to save the record.
NOTE: Upon clicking save the system will pause for a moment while the donation is entered and all associated records are created. Depending on the amount of information provided this can take up to 20 seconds.
Pledge - Do Not Create Payment
To enter pledge of a donation, set the Process Payment field to Do Not Create Payment.
This will add the pledge to the Total Pledges field on the donor record.
Pledge - Create Payment
To enter a pledge where the individual has noted that payment is scheduled/ submitted, but it has not been received by the agency set the Process Payment field to Create Payment.
This will add the pledge to the Total Pledges field on the donor record and a payment record will be created to be processed at a later date.
Pledge - Complete Payment
To enter a pledge where the individual has made payment, set the Process Payment field to Complete Payment. This will automate the payment record creation and completion, and the Tax receipt record will be created for processing.
This will also add the pledge to the Total Pledges and Total Paid fields on the donor record.
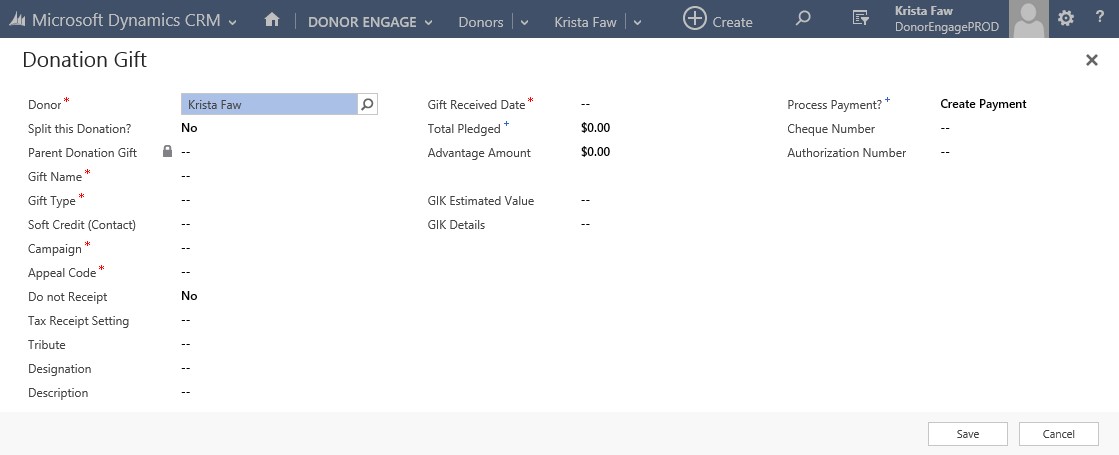
The table below provides a description for each of the fields in the Donation Gift record when created from Quick Create on the navigation bar.
| Field Name | Details |
|---|---|
| Split this Donation? | Users can toggle between Yes or No. This field defaults to No. |
| Parent Donation Gift | This field identifies the parent donation gift when a split donation is created. This is a locked field. |
| Gift Name* | Users must add a name for the gift in this field. This field is a required field. |
| Gift Type* | From the lookup field the gift type, usually Cash, Cheque, Credit Card, (monetary gifts) or Goods, Services, Stock (in kind gifts). User options will depend on the organization’s configuration. This is a required field. |
| GIK details | GIK Est Value and GIK Details are displayed if gift type is Goods, Services or Stock |
| Soft Credit (Contact) | From the drop down select a Contact who is soft credited for the donation. |
| Campaign* | Select a Campaign from the lookup field. This is a required field. |
| Appeal code* | Select an Appeal code from the lookup field. This is a required field. |
| Do not Receipt | Users can toggle between Yes or No. This field defaults to No. |
| Tax Receipt Setting | Select a Tax Receipt Setting from the lookup field. |
| Tribute | Select a Tribute from the lookup field. |
| Designation | Select a Designation from the lookup field. |
| Description | Enter a short description for this gift. |
| Gift Received Date* | Enter the date on which the gift was received or select it from the date picker icon. This is a required field. |
| Total Pledged | Enter the dollar amount of the pledge. This field defaults to $0.00. Users are able to alter the amounts further in the process if the donation payments differ. |
| Advantage Amount | Users can enter Advantage amount values here which will be deducted from the receiptable totals. This Field defaults to $0.00. |
| Process Payment | Select the payment processing option: Do not Create Payment, Create Payment or Complete Payment. This field defaults to Create Payment. This selection is one of the key areas of the Quick Create form. It will dictate how far the donation needs to be pushed through the process. Clicking on the Process Payment button allows Donor Management users to complete the full process (Pledge > Payment > Receipt) with the click of a button. Below is a breakdown of each option:
|
| Cheque Number | If the payment was made by cheque enter the identifying numbers. |
| Authorization Number | Enter an authorization number. |
Full Form: New Donation
Above and beyond the Quick Create form, the full form donation gift Record allows users to enter the additional information such as recurring donations, notes and attachments or related payments.
Entering a Pledge
Users are able to use a full form in cases where more details are required such as a pledge.
To enter a pledge:
1. From the Donations entity, access the full form by clicking on New from the command bar.

The full form displays.

2. Under the Gift Details section of the full form, enter the dollar value of the pledge.
3. Click Save at the top of the form.
4. Please view Notes and Attachments and Recurring Donation Details for more details on what needs to be entered in the full form.
Notes and Attachments
Users may have additional details and notes for which they need to keep records. Depending on the organization, a pledge card may be a tool for generating pledges. Also there may be other items that need to be tracked against the record and saved with donation information. The full form provides the ability to add notes and save attachments.
To add activities, notes, or save attachments:
1. Click on Activities or Notes and add the necessary information.
2. When finished, click OK and Save.
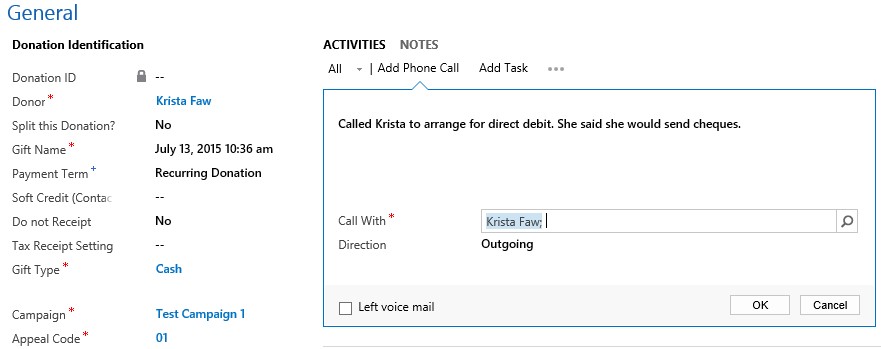
Recurring Donation Details
Recurring donations are commitments made by an individual to occur at a set schedule over time. Recurring donations can only be entered through the full form.
To create a Recurring Donation:
1. Toggle to Recurring Donation in the Gift Payment Term field on the full form.
The Recurring Payment Settings now display additional setting options.

- Select the Frequency of the donation payment (Weekly, Monthly, Quarterly, Annually).
- Identify the amount for each payment by entering the Recurring Payment Amount
- Select the day in which the payment is processed in the Process Day of the Month field
- Select the Payment Start Date to initiate the payment process
- Select the Payment End Date to conclude the payment process. This is also useful as payment types like Credit Cards have expiry dates. This can help to reduce payments attempted on old cards.
- Select Pause Payments to enable the payment schedule to be suspended
- Note: Fields marked with a red asterisk indicate that completing the field is mandatory.
- Click Save at the top of the form.
Payment Processing
Creating Donation Payments
Once the donor has either paid the amount pledged or advised that payment is on route, users can begin processing the payment.
To process the payment:
1. Navigate to the donor record and locate the donation.
2. Click the link under Gift Name to open the donation record.

The Donation Gift: Information displays.
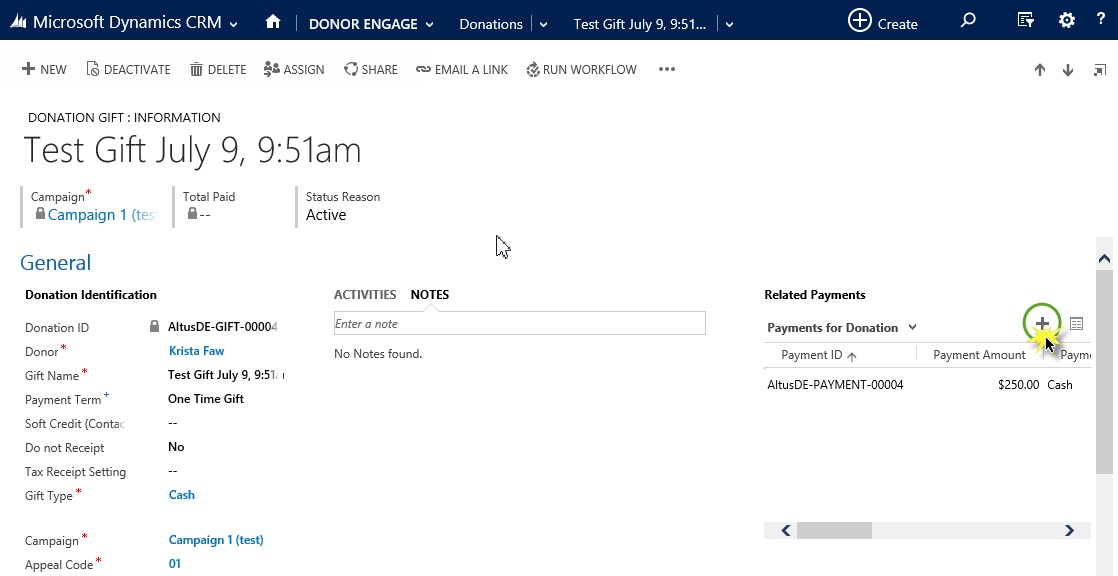
3. Click on the + button on the right under a sub-grid for Related Payments but no records will be found.
A Donation Payment form displays.
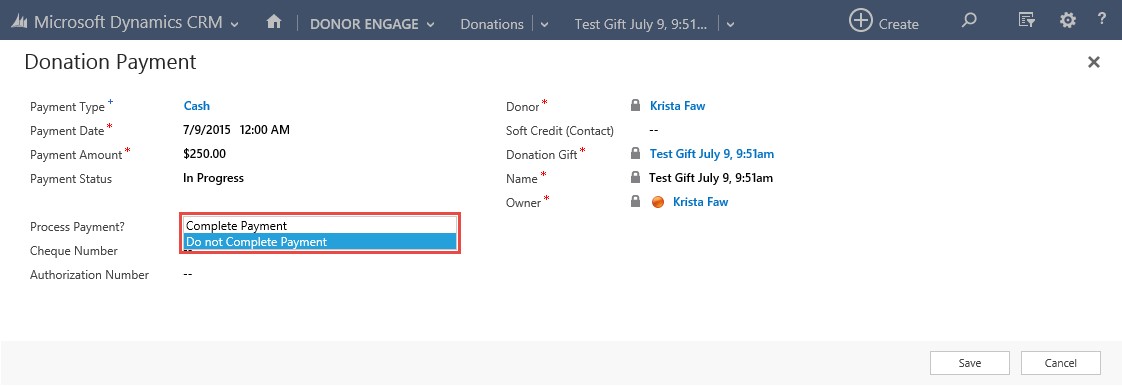
4. You can elect to use Do not Complete Payment. This will create the payment but will not mark it as received, thus the tax receipt record will not be created.
OR
5. If the payment has been received, you can select Complete Payment. This will trigger the payment record to complete and the tax receipt record will be created.
The system will add the payment amount to the Total Paid field on the donor record.
Completing Donation Payments
Once a donor has paid the amount they have pledged, it is time to process the payment.
To process a pledged payment:
1. Navigate to the donor record and locate the donation (note that it will not include any Total Paid Amount).
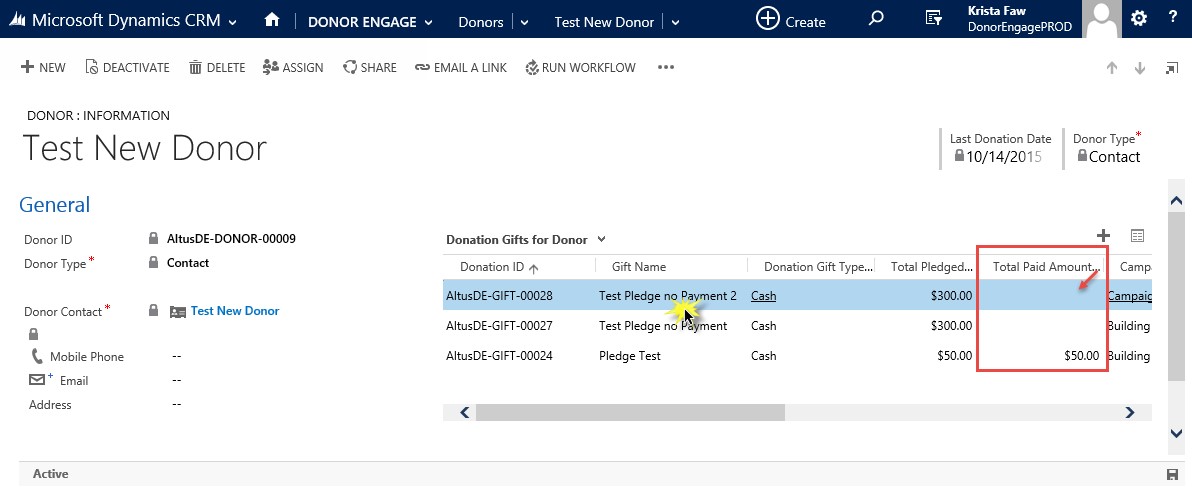
2. Hover over the Gift Name and click the link to open the donation record.
The Donation Gift information displays.
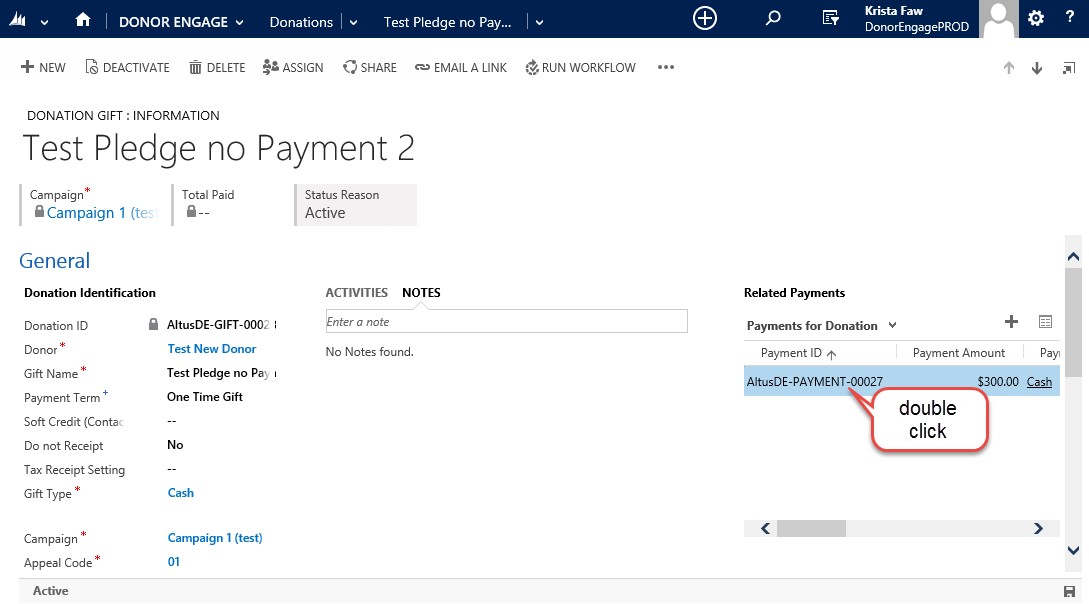
3. From the Related Payments sub-grid on the right, locate the payment record for the donation.
4. Double click the payment status to open the record.
The Donation Payment information displays.
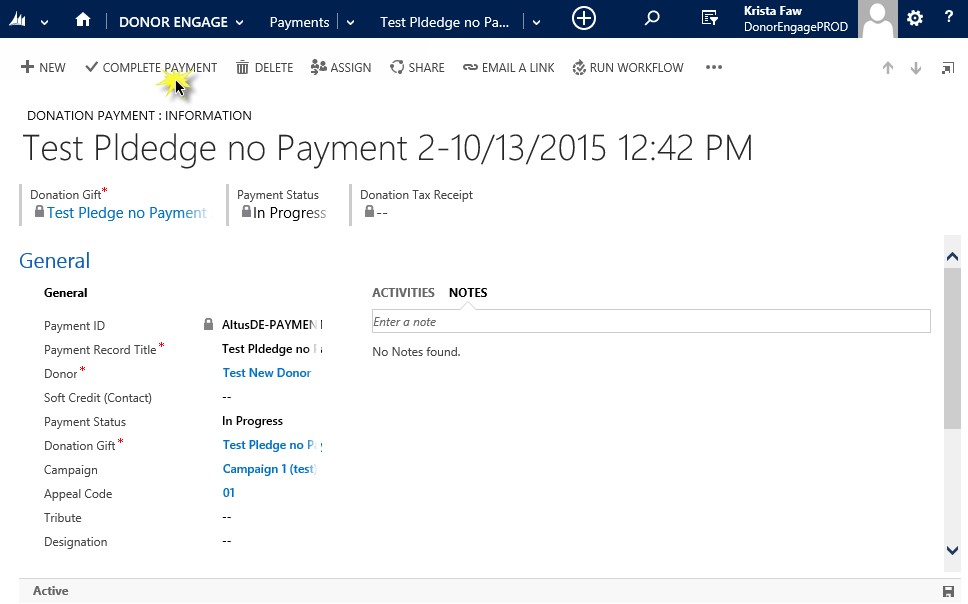
5. From the command bar, click Complete Payment.
6. A new window opens. Select Canceled or Completed Successfully. Selection of Completed Successfully will trigger the system to finalize the payment and create the tax receipt record.
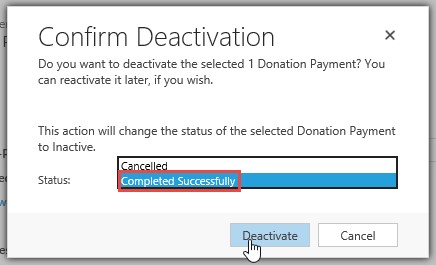
7. The system will add the payment amount to the Total Paid field on the donor record.
Split Donations
Donor Management is equipped with the ability to separate donations into segments. It means that a single donation can be separated within itself to represent values to different campaigns/appeals/designations/tributes. This section of th user guide will explain how to create and process split donations.
This is best illustrated by an example:
A donor provides a $1000 donation. This donation is three fold:
- $300 is a general donation toward the General Operating fund
- $500 is a general donation toward the cost of running a Gala event
- $200 is a general donation toward the Go Girls! program
Within a single donation record, users can make this differentiation and have the correct amounts rolling up to the related campaigns/ appeal/ designations. Only one tax receipt is generated for this donation, with a breakdown of the child donations.
How to Split Donations
Donations can be split by campaign, appeal, designation or any combination of those items. This requires a donation ‘umbrella’ to be created, which establishes the broad donation itself (that is the entire donation amount and some donation details). Once the donation record has been created, those identified as being split will enable an area where the details of the split can be entered. This is done by adding subsequent donation records to this umbrella, the total of which equates to the umbrella donation total.
Creating the Initial Donation
To create a split donation:
1. From the + Create, select the Donation Gift tile.
On the navigation bar select the Donor Engage tile.
The work area icons will appear.
The Donation Gift form displays.

2. Ensure the Split this Donation field is set to Yes.
3. Fill in the rest of the fields as you require.
You will notice you cannot set the Payment Status to Complete Payment; this can only be done after you have provided the detail of the split(s) for this donation.
4. Click Save to save the record.
At this time, the system will prepare the record to be split. The record will save and you can then open the donation record. Depending on where you are in the system when you create this donation, you may see an option to View Record or Create Another.
5. To complete the detail of the split, click View Record to open the donation record just created.

Add the Split Donations
To add the split details to a split donation:
1. If you have been following the steps above, the donation record will load. If you are working on details for another split donation, locate that donation in the active donations and click on the correct gift name.
2. Scroll down to locate the Split Donations section.
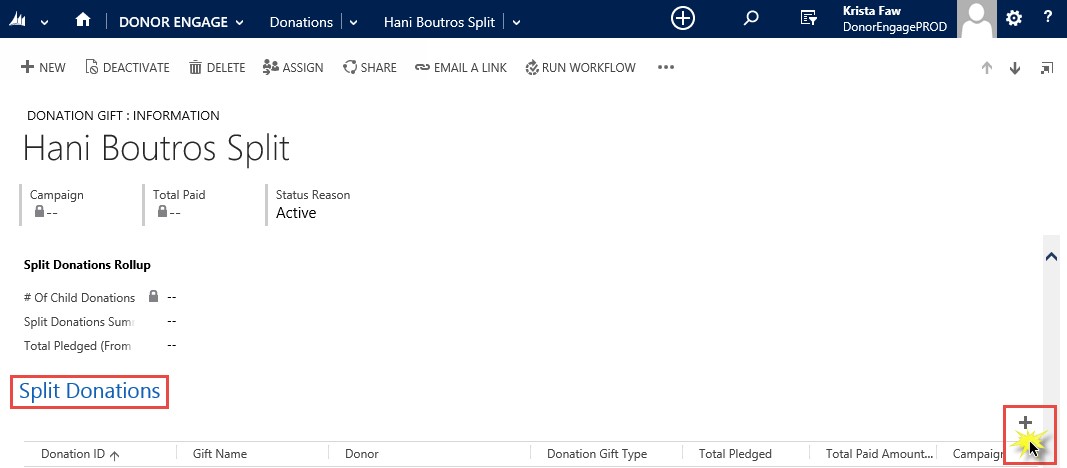
3. On the right side, click the + sign to add a split.
This will open what appears to be a new donation record; however, you will notice that several of the fields are already populated and the Parent Donation Gift shows the donation record just created.
4. Fill in the information required on this record (Campaign, Appeal Code, and Total Pledged, as well as any other fields you wish).
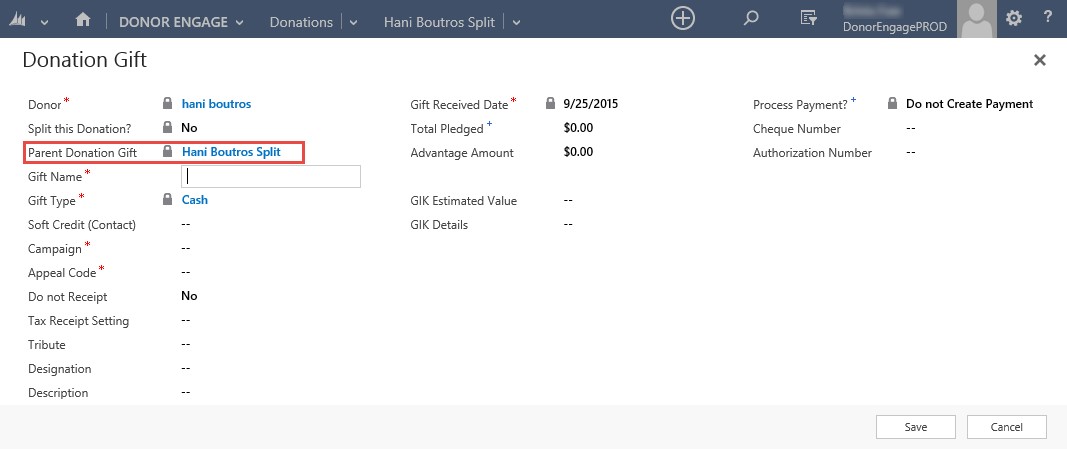
5. Click Save.
6. Repeat steps 3 to 5 until all of the split details have been added.
NOTE: Fields marked with a red asterisk indicate that completing the field is mandatory.
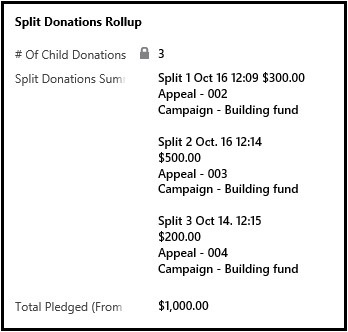
7. To view Split Donations Rollup information, click refresh. The Split Donation Rollup tracks the number of splits and pulls key information into a text box for reference.
Complete the Payment
Note that the payment record will remain as In Progress and needs to be updated manually. This can only be done when the total added value of all splits is equal to the Payment Amount.
To complete the payment of a split donation:
1. Ensure the total sum of all split donations equal the payment amount.
2. Navigate to the specific parent donation record.
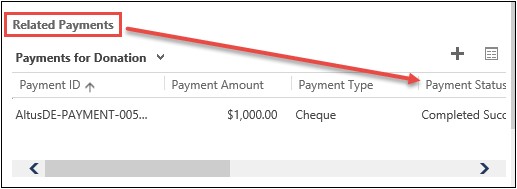
3. On the right of the main donation record under Related Payments, scroll over to the Payment Status column.
NOTE: Configuration may vary by organization causing some differences in the views.
4. Double click In Progress under the Payment Status column.
5. The Payment Record displays.
6. Click Complete Payment.

NOTE: If the total of all split donations does not equal the payment amount, an error will be produced:

7. Once correct, the system will update the record to state that the payment has been processed and all fields will be locked.
You have completed the Split Donation.
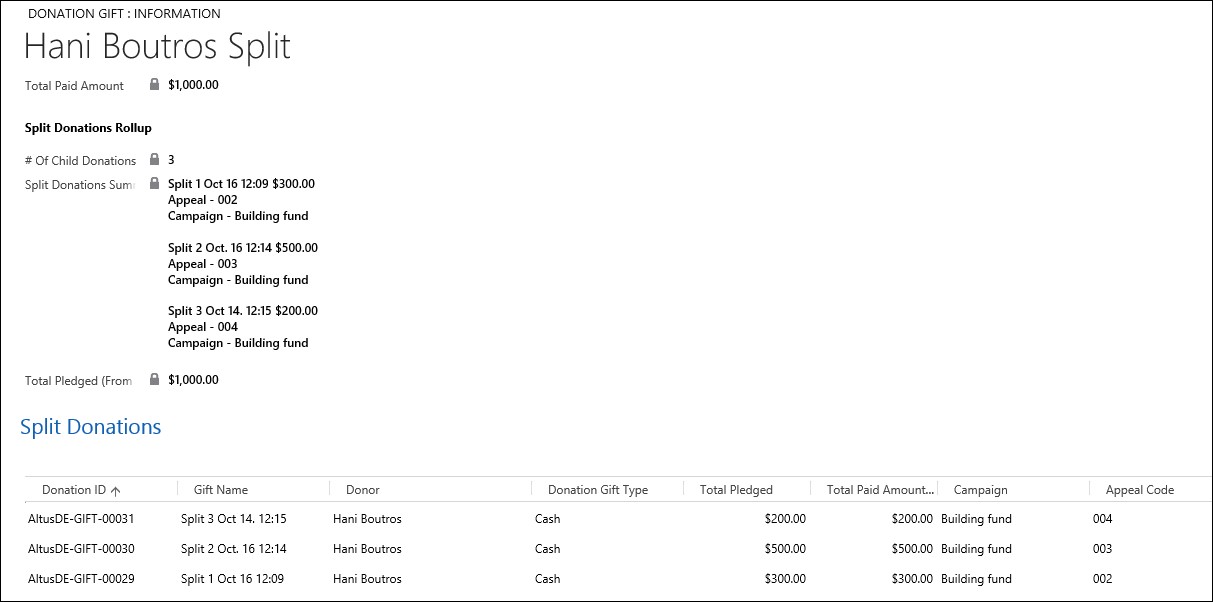
Viewing the Split Donation
Users may wish to view how a donation has been split and all details relevant to each split.
To view how a donation has been split:
1. Open the donation record in question.
2. In the Split Donation section you find displayed all of the splits and relevant information about each split under Split Donation Rollup.